Minimal setup to start a python project in 2024: with uv, vscode, ruff and pytest.
Meet Astra UV
What’s UV, Anyway?
UV is the new superhero of Python package and project management, built in Rust by the same masterminds behind ruff. If you haven’t been keeping up with the latest Python buzz, let me catch you up: in 2024, Astra, ruff, and uv are kind of a big deal.
So, what’s the fuss about? Imagine combining the best tricks from Rust’s cargo and JavaScript’s npm, and then making it blazing fast. That’s UV—20x faster than other tools in the game.
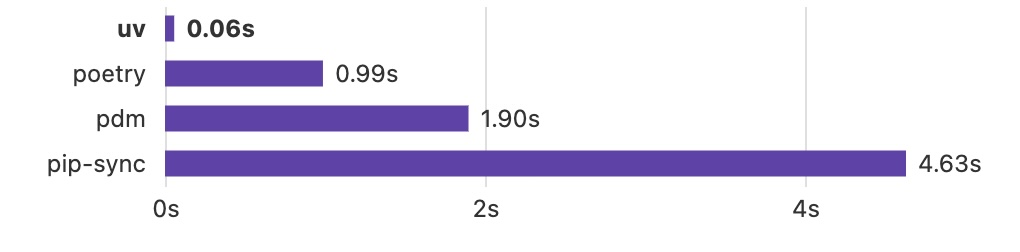
Over the years, I’ve dabbled with pretty much every Python packaging tool out there: virtualenv, conda, setuptools, pip, pyenv, poetry—you name it. At first, they all seem like magic. But then the cracks start to show: weird edge cases, building from source, private repos, OS-specific versions—it can get messy. After three months with uv on 10+ projects, I’ve got a feeling this is the one. But, let’s see what the future holds…
Basic Usage
Installing uv is simple:
curl -LsSf https://astral.sh/uv/install.sh | shTo set up a project:
uv init . --package

# Add dev dependencies:
#   ruff for linting and formatting
#   ipykernel for using Jupyter in VSCode
uv add --dev ruff ipykernel pytest pytest-cov mypy

# Add project dependencies
uv add python-fasthtml pandas duckdb
These commands took less than 3 seconds on my PC. This changes everything.
There’s no need to reuse virtual environments anymore! It only takes seconds to create a new one.
The following structure is created:
pyproject.tomlfile.venv/local virtual Python environmentuv.lockfile, recording the exact version of every installed dependency, including sub-dependencies and their versionssrc/myapp/__init__.pyproject structure
uv smartly avoids installing another Python version. Instead, it creates a symlink to my local Python 3.11
To sync between pyproject.toml and .venv—for example, after cloning a project:
# Install the versions recorded in uv.lock
uv sync

# Or update the packages and uv.lock
# Note: It’s your responsibility to ensure everything works before committing
uv sync --upgradeThis ensures the entire team works with the same package versions.
These same versions will be used during deployment, and it keeps track of the last working configuration in case of conflicts.
Running and Importing with UV
When you run uv sync, it installs your project as an editable package, making it accessible anywhere within the same virtual environment (venv). This means you can easily do import myapp in your notebooks/wip/Untitled27.ipynb, without the usual os.path.insert(0, "...") hacks to handle imports. 🎉
To make sure you’re running in the correct environment, you can use uv run. Here are a few examples:
uv run python script.py
uv run myapp.main
uv run pytest
uv run mypy
Honestly, I’ve just scratched the surface of what uv can do. The tool is still evolving, but it’s already powerful. If you’re curious, check out the official docs, which are top-notch.
pyproject.toml - The One File to Rule Them All
pyproject.toml is the heart of your setup. It’s the single file that defines your project’s dependencies, build configuration, and tooling preferences—all in one place. Whether you’re managing packages, setting up development environments, or configuring linters like ruff, this file handles it all.
Here is what the file looks like
[project]
1name = "myapp"
version = "0.1.0"
description = "Add your description here"
readme = "README.md"
2requires-python = ">=3.11"
3dependencies = [
    "duckdb>=1.0.0",
    "python-fasthtml>=0.5.1",
]

4[tool.uv.sources]
python-fasthtml = { git = "https://github.com/AnswerDotAI/fasthtml.git" }

5[project.scripts]
hello = "myapp:hello"

6[build-system]
requires = ["hatchling"]
build-backend = "hatchling.build"

[tool.uv]
7dev-dependencies = [
    "ipykernel>=6.29.5",
    "pytest>=8.3.2",
    "pytest-cov>=5.0.0",
]

8[tool.ruff]
line-length = 100
target-version = "py311"

9[tool.pytest.ini_options]
addopts = "--base-url http://0.0.0.0:5001"

[tool.mypy]
warn_return_any = False- 1
- Name of the project/package and other metadata
- 2
- Python version, managed by uv
- 3
- PyPI dependencies
- 4
- UV config: Dependencies built from source
- 5
- Entry points (e.g., CLI commands)
- 6
- Build configuration
- 7
- Dev dependencies for tools like linters, formatters, and test suites (managed by uv)
- 8
- Tool config for ruff, which replaces isort, black, and flake8
- 9
- Tool config for pytest
No more messing around with separate requirements.txt, requirements_dev.txt, pytest.ini, tox.ini, and other scattered config files.
Wait, what about isort, black, and flake8? Don’t worry! All three have been replaced by the all-in-one magic of ruff—another brilliant tool from the Astra ecosystem.
Entry points
You can turn any Python function (that doesn’t require arguments) into a command-line interface (CLI) tool just by adding a line to the [project.scripts] section in your pyproject.toml.
Example:
Code
# myapp/__init__.py
import argparse

def start_app():
    parser = argparse.ArgumentParser(description="Start the app")
    parser.add_argument("--port", type=int, help="Port number")
    args = parser.parse_args()
    print(f"App started at port {args.port}")
Config
# pyproject.toml
[project.scripts]
start = "myapp:start_app"
Run
uv run start --help
uv run start --port 1234
# > App started at port 1234
The possibilities are endless! You can create your own custom commands for anything—from running scripts to automating build tasks—right from your terminal.
Vscode
Configuring VSCode for Python in 2024 can still be a tricky dance. Everything works seamlessly—until it doesn’t. No autocomplete? Breakpoints not triggering? Debugging doesn’t work with tests or notebooks? You get the idea.
After countless frustrating searches, I’ve arrived at a minimal, understandable configuration that consistently works for me. Now, I just copy it from project to project. Here’s my setup, with comments:
// Extensions to install:
//  - Python (Microsoft)
//  - Jupyter (Microsfot)
//  - Ruff (Astral Software)
//
// .vscode/settings.json
{
  "editor.formatOnSave": true,
1  "[python]": {
    "editor.defaultFormatter": "charliermarsh.ruff",
    "editor.codeActionsOnSave": {
      "source.fixAll": "explicit",
      "source.organizeImports": "explicit"
    }
  },
  "[json]": {
    "editor.defaultFormatter": "esbenp.prettier-vscode"
  },
  "notebook.formatOnSave.enabled": true,
2  "notebook.codeActionsOnSave": {
    // "notebook.source.fixAll": "explicit",
    // "notebook.source.organizeImports": "explicit"
  },
  "notebook.output.wordWrap": true,
  "notebook.output.textLineLimit": 200,
3  "jupyter.debugJustMyCode": false,
  "python.testing.pytestEnabled": true,
  "python.testing.pytestArgs": ["tests"],
4  "files.exclude": {
    "**/*.egg-info": true,
    "**/htmlcov": true,
    "**/~$*": true,
    "**/.coverage.*": true,
    "**/.venv": true,
    "**/__pycache__": true,
    "**/.mypy_cache": true,
    "**/.pytest_cache": true,
  }
}

// .vscode/launch.json
{
  "version": "0.2.0",
  "configurations": [
    {
      "name": "Python: Debug Tests",
      "type": "debugpy",
      "request": "launch",
      "program": "${file}",
      "purpose": ["debug-test"],
      "console": "integratedTerminal",
      "justMyCode": false,
5      "env": { "PYTEST_ADDOPTS": "--no-cov" }
    }
  ]
}- 1
- Format on Save: Automatically formats Python code and organizes imports using ruff on save.
- 2
- Notebooks: Enables formatting, but ruff won’t remove unused imports.
- 3
-
Debugging Notebooks: Set
debugJustMyCodeto false here, not just in launch.json. - 4
- Excluded Files: Hides unnecessary files from the editor.
- 5
- Debugging with Tests: Prevents conflicts by disabling coverage while debugging.
And you’re ready to go…
With everything set up, your project structure should look like this:
.venv/
.vscode/
  settings.jon
  launch.json
.gitignore
pyproject.toml
README.md
src/myapp/
  __init__.py
tests/
Now you’ve got a fully configured Python project with all the modern tools, ready for development in 2024 and beyond!